 Dansk
Dansk
 Deutsch
 Español
 Français
 Italiano
 Norsk
Norsk
 Polski
 Português
 Suomi
Suomi
 Svenska
Getting started with your shop - Manual
Art. no. 216070569
In this manual, we'll take you through the 9 most important steps to get you started selling in your shop.
We'll cover the following points in the text.
We will also link to other pages for more detailed settings and steps.
Click on the title to go directly to the section you want help with:
Add product groups
Add products
Choose theme
Add payment methods
Add shipping methods
Add terms and info
SignGDPR agreement
Add Domain
Go live with your store
Add product groups
We recommend that you start by adding product groups, as the product groups form the menu.

Follow the steps below to add product groups:
- Go to Assortment in the left menu
- Click on Product groups
- Click on Add your first product group!

- Go through and fill in the fields*
- You can add introductory text and image to each product group*
- Finish with Add
*We go through thesesteps in detail in the manual linked below.

Click below for a more detailed description of each step.
Add products
You can choose to add products manually or via import.
- Go to Assortment in the left menu
- Click on Products
- Choose whether to Import from a file or manually Add your first product.

Click below for a more detailed description of each step.
Manual - Add your first products
Manual - Import with file
Add a theme
There are currently 8 different themes to choose from, each with a different design.
Add the one that suits you best.
- Go to Appearance in the left menu
- Click on Themes
- Select the Theme Templates tab
- Add: Select the theme you want to use in your store.
Demo: Here you can get a glimpse of what the theme might look like.
Learn more: Click here to get some extra information about the theme.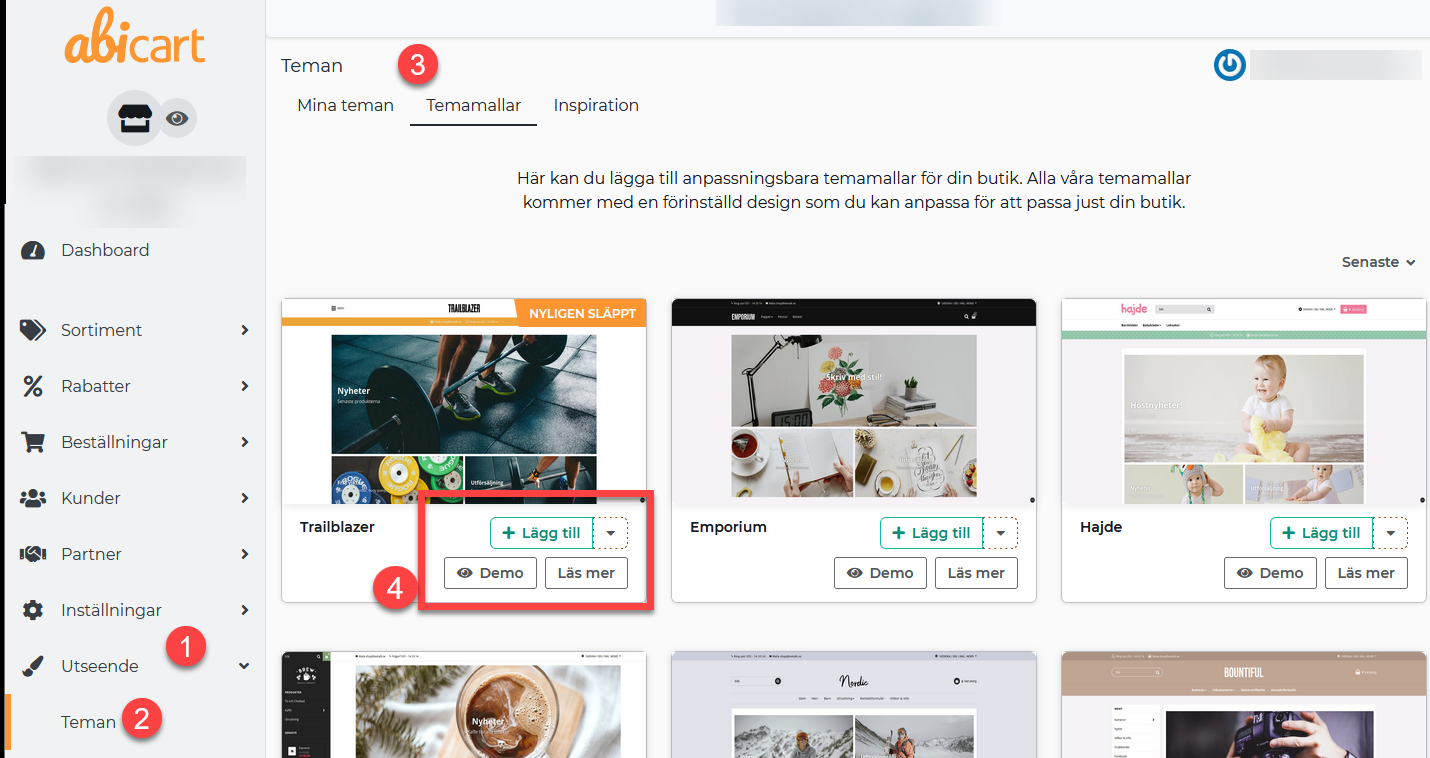
- Under the My themes tab you will find your added themes, this is also where you edit them.
- Click on the pencil to edit.
- Via the eye you can preview your store.
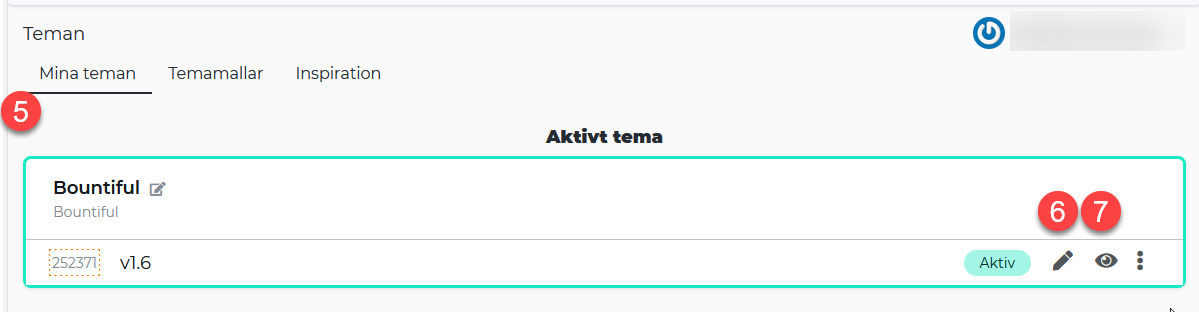
Click below for a more detailed description of how to edit the theme.
Add payment methods
We support multiple payment methods both domestically or if you want to go global.
Remember. Always start by getting an agreement with your supplier.
- Go to Settings in the left menu.
- Click on Payment methods
- In the "Add a new payment method" list, add your preferred payment option.
- Finish by clicking on Add

For information on activation and other settings, go to the link below and find your provider.
Add delivery methods (Shipping)
Here you add your different delivery methods and name the suppliers you will send your goods with.
Don't forget!
You need to create separate agreements with the suppliers you have chosen.
- Go to Settings inthe left menu
- Click onFreight
- In the top right corner, click onNewshipping method
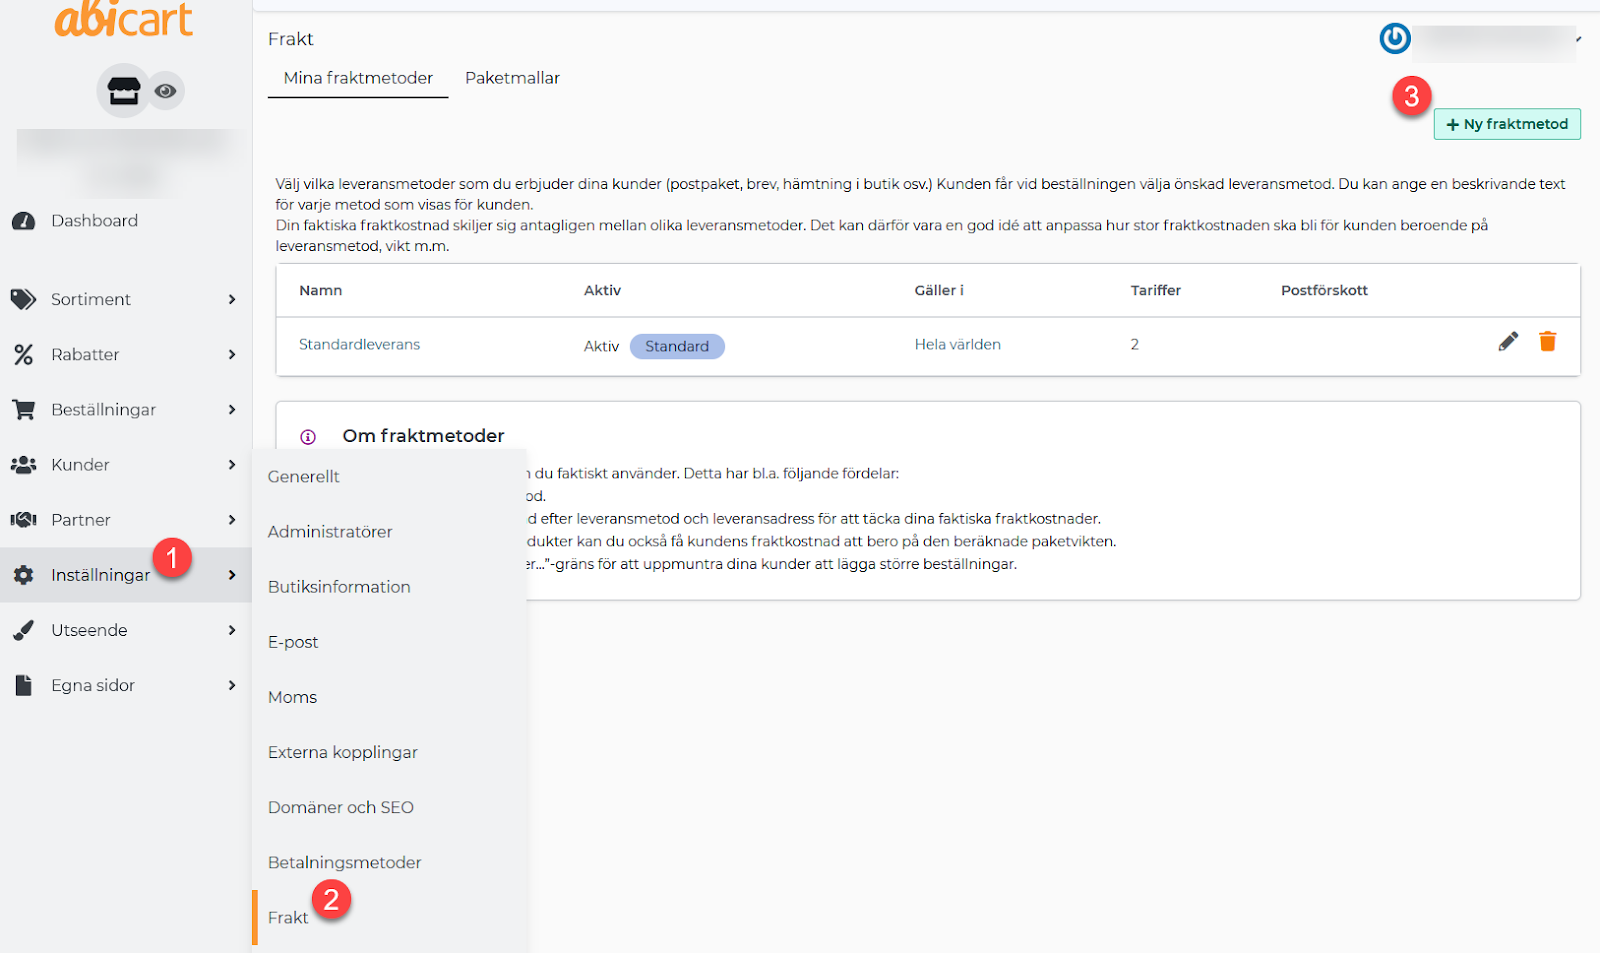
- Here you name the supplier for example Postnord, DHL etc.
- Remember to check "Active" for the delivery method to be visible to the customer.
- FinishwithAdd

For information about weight ranges, fees, links to countries/customer groups, free shipping etc. click on the link below.
Manual - Delivery methods
Add terms and info
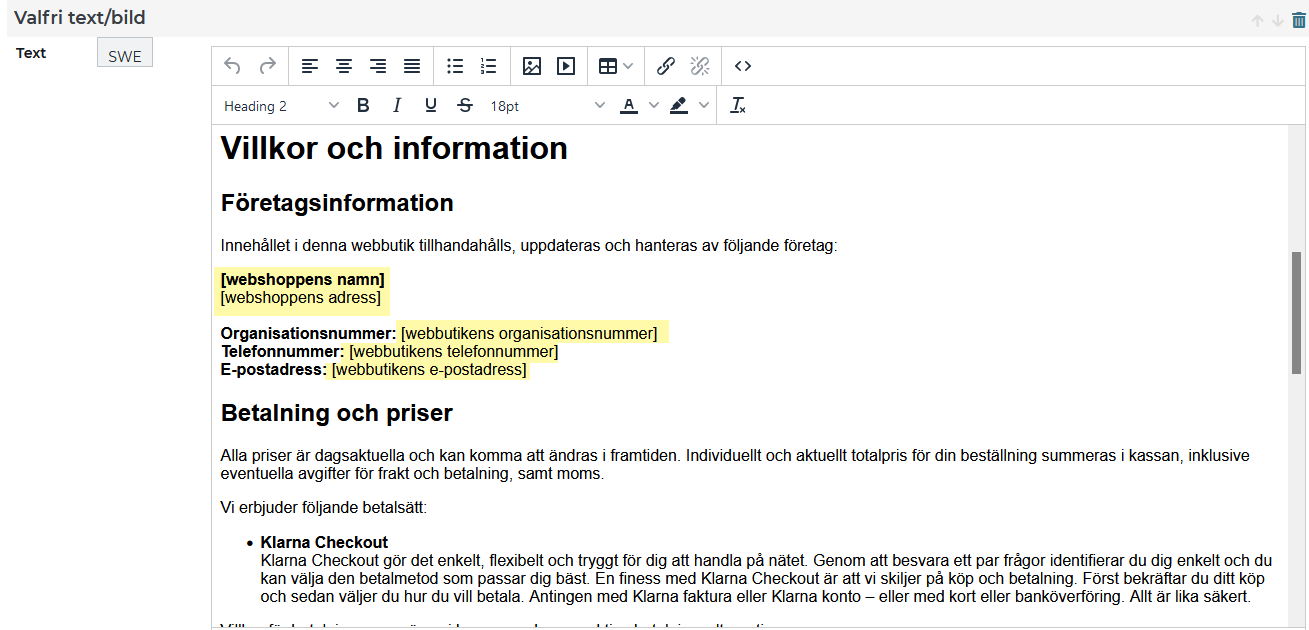
It is important to tell your customers about what applies in your store, for example, info regarding returns, delivery time, etc. In Abicart there is a ready-made template that you can use.
- Go to My pages in the left menu
- Click on Terms & info

The template for Terms and info:
The template is created based on what stores generally have for Terms and Info.
The yellow fields below show text you need to replace with your own.
In the template, there are ready-made headings that you can use. Review and edit the text under each heading to ensure it matches your terms and conditions.
Follow the steps in the manual below to make your "terms and info" visible on the homepage.
Manual - Linking to your own pages
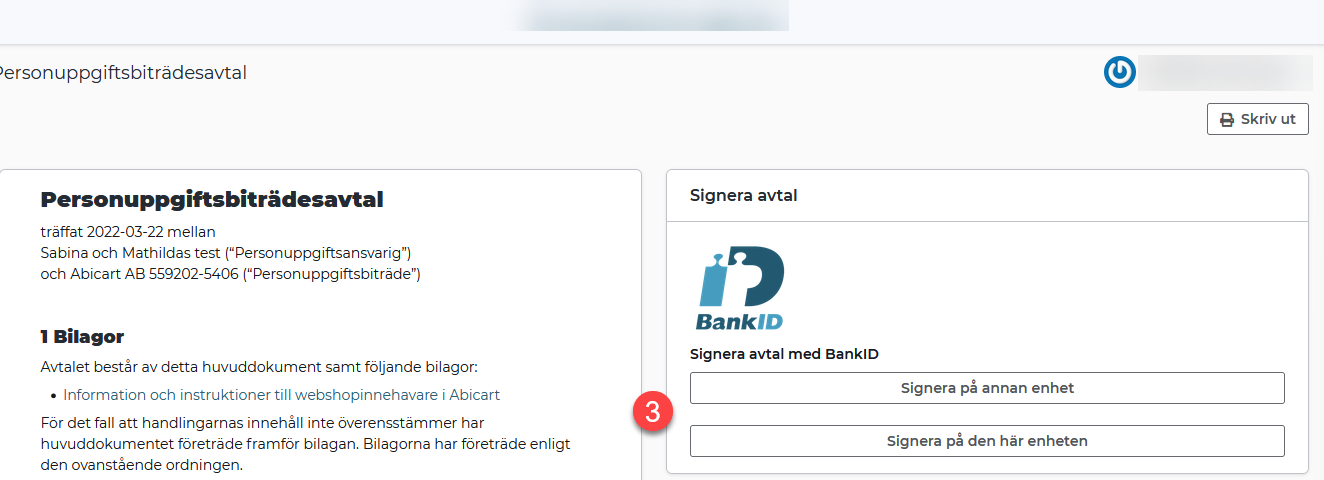
Sign the GDPR agreement
- Click on Dashboard in the top left menu
- Click on the Sign agreement button

- Choose whether to Sign on another device or Sign on this device.
Below you will find information about GDPR for you as a shop owner.
Manual - GDPR
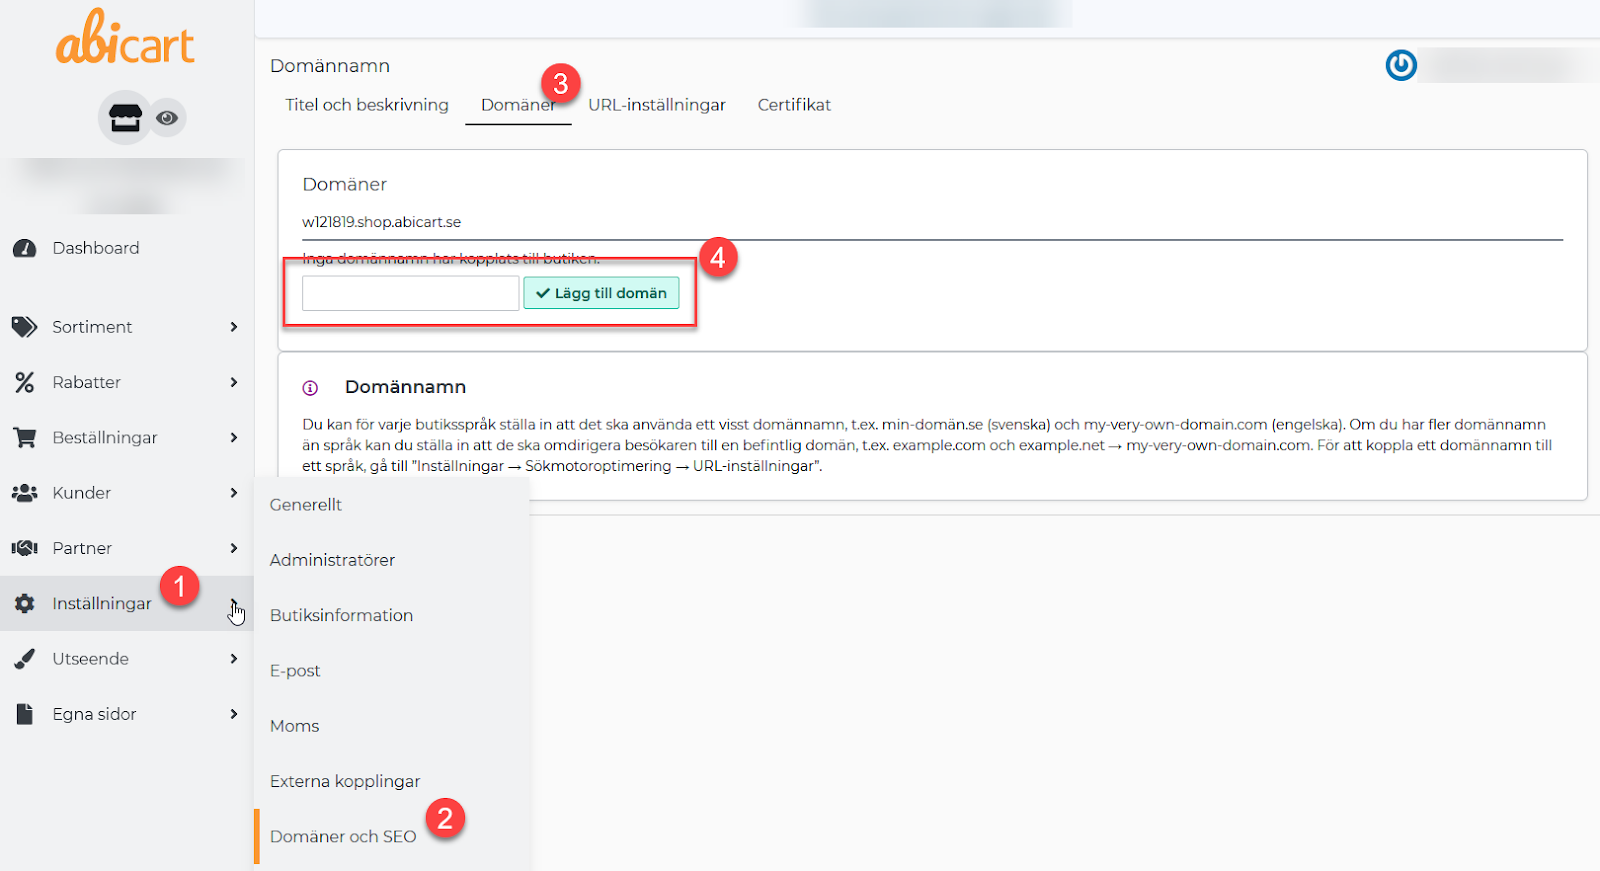
Add Domain
The domain name is the address of your shop, for example www.abicart.se.
Having a domain name gives credibility to your customers.
Don't forget it!
Start by buying a domain name. You can do this through a domain name provider or through a web host.
- Go to Settings in the left menu
- Click on Domains and SEO
- Click on the Domains tab
- Type in your domain name and finish with Add domain
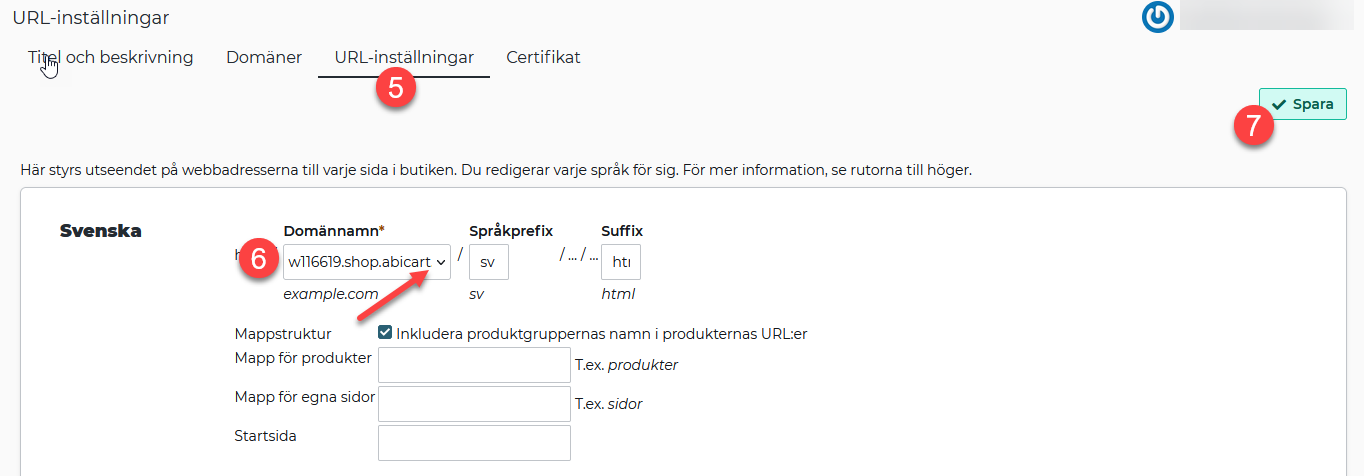
- Go to the URL settings tab
- In the drop-down list, select the domain name you just added.
- Finish by clicking on Save
Click below for a detailed description on how to redirect your domain name.
Manual - Connect domain to the store
Go live with your store
Now that your shop is getting ready, it's time to make it visible.
- Go to Settings in the left menu
- Click on General
- Uncheck Hide store
- Finish by clicking Save

 with Abicart